
Security has always been a major concern for businesses, and this concern is even greater when it comes to mobile applications. Today, almost every leading brand or product has a mobile app to connect with their customers more easily.
More users than ever, rely on mobile applications for a majority of their digital tasks over traditional desktop applications. In 2015 in the U.S. alone, users spent 54% of their digital media time on mobile devices actively using mobile apps. These applications have access to large amounts of user data, much of which is sensitive data and must be protected from unauthorized access.
From a pentester’s perspective, there is a growing need for skilled mobile pentesters. To me mobile applications have always been an interesting attack surface, and although all popular mobile platforms (iOS & Android) provide their own set of security controls designed to help the developers build secure applications this is often left to the developer to choose from a variety of security options. If not implemented properly, or left misconfigured, they introduce security loopholes in an application.
In this blog, I will focus on android application security resources and demonstrate how one can get started with setting up an android test lab and start discovering vulnerabilities.
Android Core
Android applications are written primarily in Java, Kotlin, and C++. When distributed, they use the .apk extension which stands for Android Package. An APK is a ZIP file containing a predefined structure that is used to store different components of an application, like assets and bytecode, such as the one mentioned below.
A typical unzipped APK structure:
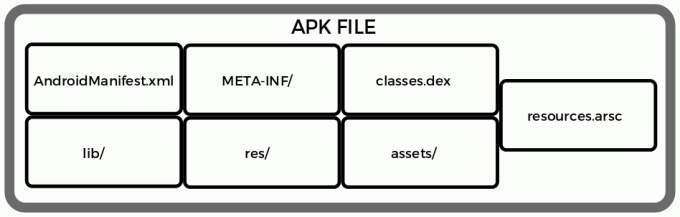
Structure of a typical Android package:
Testapp.apk ├── AndroidManifest.xml

├── META-INF/

├── classes.dex

├── lib/

├── res/

├── assets/

├── resources.arsc__
1. AndroidManifest.xml
This file contains the meta-information about the app, such as: the name of the app, package name, different activities and services, permissions required, supported version of Android, etc.
2. META-INF/
The META-INF/ folder is essentially a manifest of metadata information, including the developer certificate.
A Directory with APK metadata in it, such as its signature.
3. classes.dex
The classes.dex file contains app code in the Dex file format, this file contains the Java libraries that the application uses.
4. lib/
Lib is a directory with compiled native libraries used by your app.
5. res/
The ‘res’ stands for Resource file. It can store resource files such as pictures, XML files, etc. It contains some additional folders such as Drawable, Layout, and Values.
6. assets/
A directory with application assets.
7. resources.arsc
Application resource file which contains compiled resources in a binary format; may include images, strings, or other data used by the application.
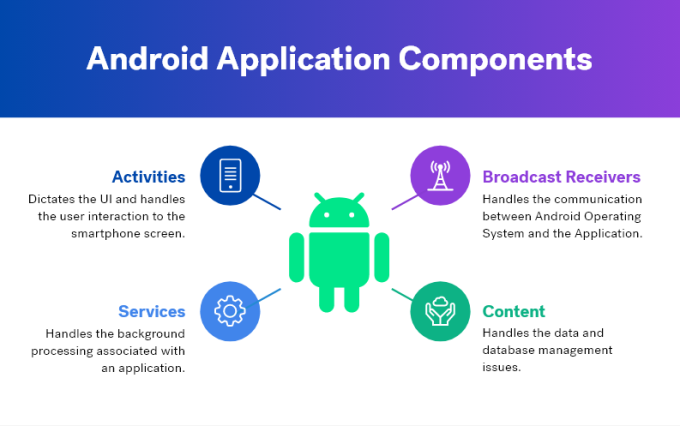
Application Components
Application components are the essential building blocks of an Android application. These components are loosely coupled by the application manifest file AndroidManifest.xml that describes each component of the application and how they interact.
Typical Android application components include:
1. Activities
2. Services
3. Broadcast Receivers
4. Content Providers
Android Application Security Testing
Now that we have familiarized ourselves with the components and structure of an Android application, let’s dive into the pentesting methodology for a typical Android application. The methodology of testing an Android application can be broadly divided into two categories:
1. Static — Method of analyzing the application by examining source code and the package before the application is run.
2. Dynamic — Method of analyzing the application by executing it in real-time.
Let’s begin with Dynamic Testing, taking a look at how they are performed and the tools required.
Testing Environment
To begin an Android pentest, one would need a physical device or an Android emulator running the most recent Android version as a testing environment. Below are the tools and programs you’ll want to leverage along with the steps on how to quickly set up an Android test lab:
Exploring some of the Tools & Programs
Genymotion: This is one of the most used Android emulators. It's both powerful and widely used by developers and pentesters because of its ease of use.
- Download Genymotion here
- Change the file permission and make it executable:-
$ sudo chmod +x Genymotion-3.2.1-linux_x64.bin
- Install it :-
$ ./Genymotion-3.2.1-linux_x64.bin
VirtualBox: Genymotion uses VirtualBox as a virtualization platform to host an Android VM. Therefore, before getting Genymotion, you will need to install VirtualBox. Install: $ sudo apt install virtualbox
Android SDK Platform-Tools: Android SDK Platform-Tools is a component for the Android SDK. It includes tools that interface with the Android platform, such as adb, fastboot, and systrace. These are essential components required during Android debugging and need to be installed. Download the Android SDK Platform-Tools here.
Appie: Appie is a software package that has been pre-configured to function as an Android Pentesting Environment on any windows based machine which is developed by my friend and fellow Core Pentester, @exploitprotocol.
- Download Appie here.
- Various useful tools that are important for Android Pentesting are included, refer to the usage of Appie here.
Now that we have explored some of the tools and programs that are useful for pentesting Android, let take a deeper look at how to use some of them:
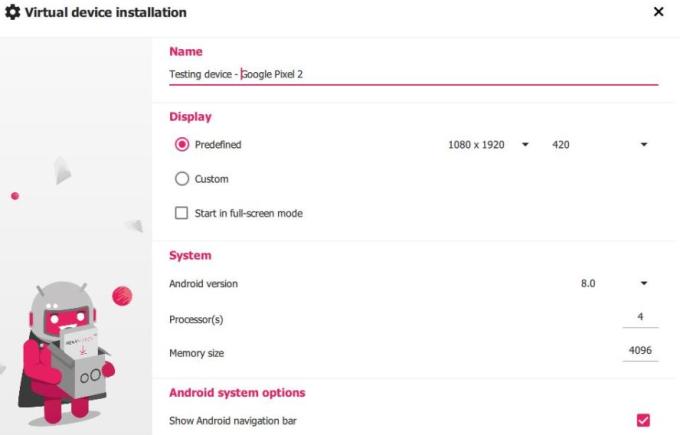
Creating a Test Device

Let us explore how to add a virtual device on Genymotion and configure it:
- Open Genymotion and press [CTRL+N] to add your virtual device.
- It’s recommended to go for Google Pixel 2 with Android version Android 9.0 Pie. Also, allocate the number of processors and memory size depending on the configuration of your device and proceed with creating a new device.
3. Let’s confirm if our virtual device is live using the Android debug bridge.

4. Listing all the listening Android devices. (And yes, it works!)
Installing a Test Application
We can install the application on our test device through Google play if available or if we are given an Android package we can install it using:
$ adb install < path to the apk-file.apk >
As an example for installing an Android app, let’s try downloading the Subway Surfers game and install it on our device.

Android Debug Bridge
Android Debug Bridge (adb) is a versatile command-line tool that lets you communicate with a device. As we go further we need to get familiar with a few of the important adb commands:
--------------|--------------------------------------------------------
1. adb        | adb devices (lists connected devices)
basics:       | adb devices (lists connected devices)>",6,7,8,9 into OUTFILE
              | adb root (restarts adb with root permissions)
              | adb kill-server (kills the adb server)
              | adb reboot (reboots the device)
              | adb devices -l (list of devices by product/model)
              | adb shell (starts the background terminal)
--------------|--------------------------------------------------------
2. Package    | adb install <apk> (install app)
Installation: | adb uninstall <name> (remove the app)
--------------|--------------------------------------------------------
3. Important  | /data/data/<package>/databases (app databases)
  Paths:      | /data/data/<package>/shared_prefs/ (shared preferences)
              | /data/app (apk installed by user)
              | /system/app (pre-installed APK files)
------------------------------------------------------------------------
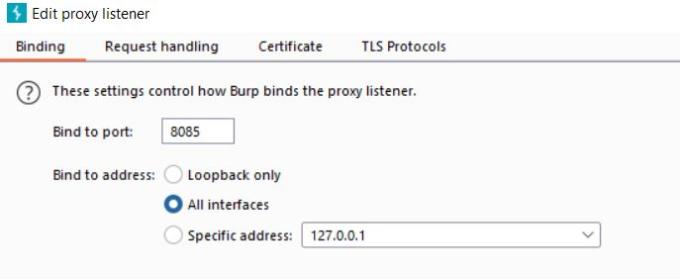
Configuring Device with Burp Suite
Configure the Burp Proxy listener
a) Navigate to “Proxy -> Options -> Proxy Listeners” and Add a new listener on all interfaces on whatever port you’d like. Here, we will choose 8085
b) Adding proxy on an Android device:

- Navigate to Settings > Network & Internet > Wifi> Click the Advanced options drop-down menu and set Proxy to manual.
- For hostname, enter the IP address of the local machine that is running Burp Suite.
- For the Proxy port, enter the port that the burp is listening on (here, we have set 8085).
c) Installing Burp’s CA Certificate in an Android Device
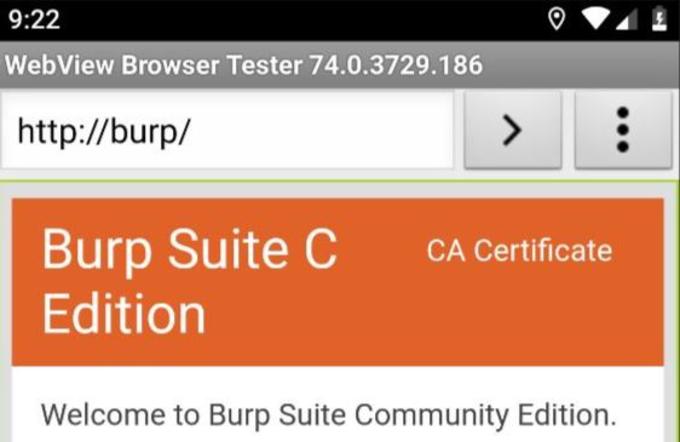
- Open up the browser in the Android device and type “http://burp/”. Burp suite’s page will open. Now click on the “CA Certificate” button in the top right corner.
- Or you can download the cert on your computer and can add it to your device using
$ adb push (path of certificate) /sdcard/Download
- The default format of Burp’s CA certificate is “.der” format, but android does not support the “.der” format for certificate installation.
- Navigate to the downloaded file and rename it to “burp.cer.”

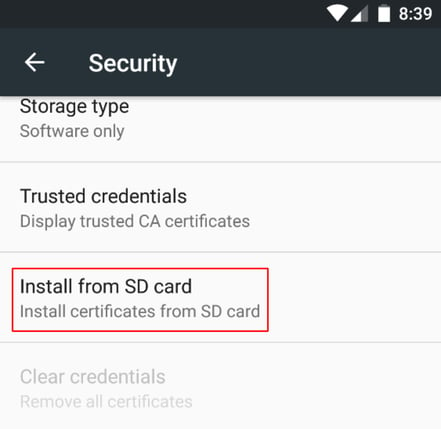
- Install the certificate by navigating to Settings → Security → Install certificate from SD cards.
- Let's verify if it's working perfectly.
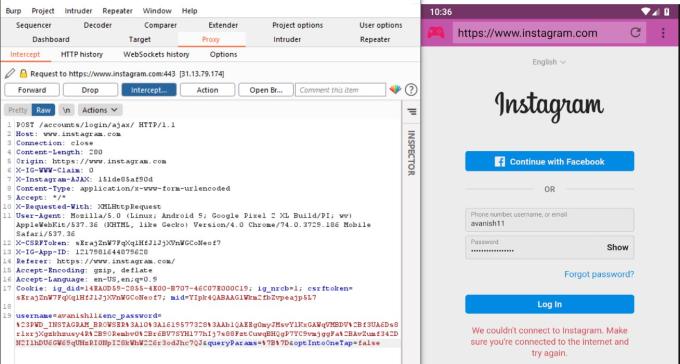
- And it works perfectly as the request is sent through the Burp Suite.
Bypassing SSL Pinning on Android
SSL pinning: allows the application to only trust the valid or pre-defined certificate or Public Key. Developers use SSL pinning technique as an additional security layer for application traffic. In the SSL Pinning implementation, the application does not trust custom certificates and does not allow proxy tools to intercept the traffic.

Frida is a dynamic instrumentation toolkit that is used to inject snippets of javascript into the application running process, where your JS gets executed with full access to memory, hooking functions, and even calling native functions inside the process. Using Frida we can Bypass security controls like SSLPinning and Root detection and other business logic implementations.
- SSL pinning bypass using Frida
Frida client $ pip install frida-tools
- The above command installs the latest version of Frida client on your computer.
- Now deploy the Frida server in the android system.
- Before downloading the Frida server check for the existing frida version on the client.
$ frida --version:

- Find your android device architecture
$ adb shell getprop ro.product.cpu.abi
Frida Server
- Click Here to download the Frida-server release for your android devices which matches your current Frida version installed on the client.
[frida-server-14.2.16-android-x86.xz] Here 14.2.16 is the frida version and -x86 the device architecture.
- Extract it and Push the frida server on the device
$ adb push frida-server /data/local/tmp/

- Grant necessary permissions
$ adb shell “chmod 755 /data/local/tmp/frida-server”
- Run this server on the device
$ adb shell “/data/local/tmp/frida-server &”
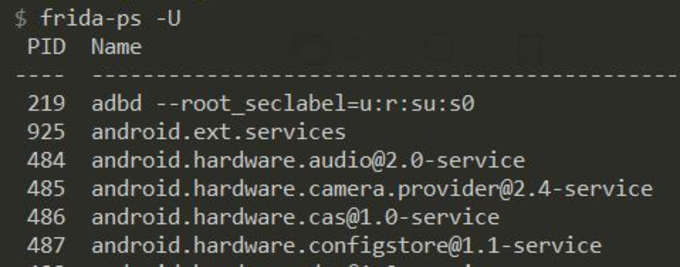
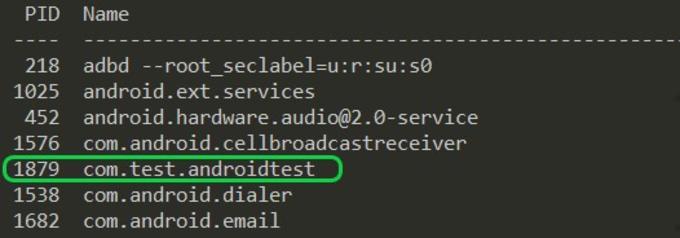
- List the processes running on the connected device and copy the package name of the application you want the SSL pinning to be bypassed.
$ frida-ps -U
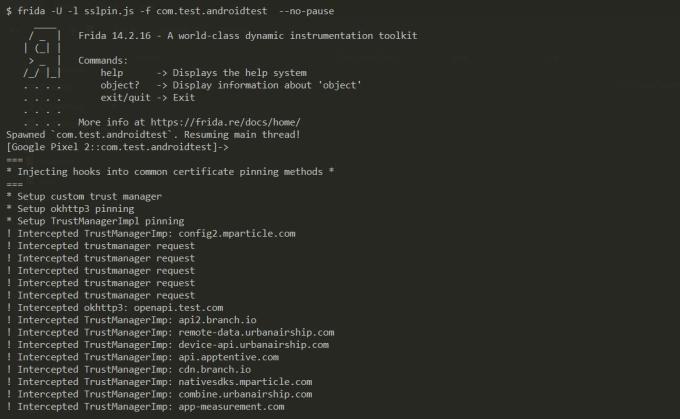
- For example, the package name for the test application here is: com.test.androidtest
-
Click here to copy a sample SSL bypass code, and Save it as a .js file & run the command mentioned below.
$ frida -U -l sslpin.js -f com.test.androidtest --no-pause
-
Here: -U stands for “USB device”
-f stands for “Filename”
-l stands for “location of js file”
- --no-pause stands for “automatically start the main thread after startup.”
Or
Frida’s codeshare repository has a massive collection of generic Frida scripts that can be used directly in the command line with downloading, this can be seen in the example below:
$ frida — codeshare pcipolloni/universal-android-ssl-pinning-bypass- with-frida -f YOUR_BINARY
Now you can successfully intercept and play around with the request sent and received by the application.
2. SSL pinning bypass using Objection (Non-Rooted)
Objection is a mobile exploration toolkit that uses Frida and automates the injection process by providing a command-line interface to the end-user that allows them to bypass the certificate pinning, dump process memory, modify values on the fly, and other security implementation by selecting various options without a need of a rooted phone.
a. Install objection:
$ pip3 install objection

- Run the following command that patches the apk with frida’s shared library $ objection patchapk -s com.test.androidtest
- A new apk with “.objection” added to the filename will be created.
- Install the application.
$ adb install (path to apk)
b. Running Objection
$ objection -g com.test.androidtest explore -q
- Disable SSL pinning using the below command $ android sslpinning disable
Now you can successfully intercept the request sent from the application without rooting your test device.
Bonus
There are many other dynamic instrumentation frameworks with a Web GUI, powered by Frida and provide a clean visual representation making it relatively simple to assess mobile applications by implementing dynamic function hooking and intercepting and intended to make Frida script writing as simple as possible.
- house : https://github.com/nccgroup/house
- RMS: https://github.com/m0bilesecurity/RMS-Runtime-Mobile-Security
Reverse Engineering Android Application
1. Decompile an APK or DEX file using jadx
Jadx is a command-line and GUI tool used for producing Java source code from Android Dex and Apk files, Its main feature is to decompile Dalvik bytecode(.dex) to java classes.
a. Download Jadx
- Download the latest release of Jadx from here.
- Extract the zip file and go to the bin directory and run jadx-gui
Or
b. Appie
- If you have Appie already set up on your machine then just type jdgui in the console and a new tab will open with JD-GUI in it.
2. Get Started Analyzing the APK
Open the APK using jadx-gui and you’ll notice a menu on the left-hand side of the screen containing some dropdown sub-menus. This view is common across all Android applications.
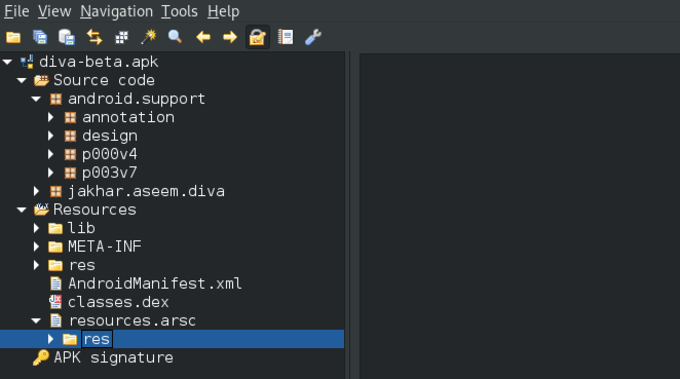
- Here the “Source code” section contains the different files that make up the application’s code.
- The “Resources” section contains app assets, versions, certificates, properties, the Android Manifest, APK signature info, etc.
- AndroidManifest.xml This file is an important part of the application because it provides data about the application structure and metadata, its components, and the requirements.
- One can check for hardcoded secrets, credentials etc. in the application binary by utilizing the search functionality.
- If the application does not strip symbols in the Java source code, it is also possible to reverse engineer and determine the client-side application logic implementation.
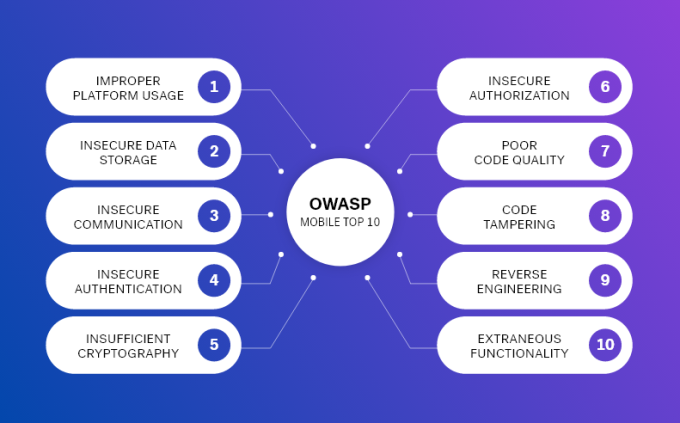
OWASP Mobile Top 10
OWASP Top 10 is the list of the 10 most common application vulnerabilities. It also shows their risks, impacts, and countermeasures. Updated every three to four years, the latest OWASP vulnerabilities list was released in 2016. Let’s dive into it:
OWASP Mobile Top 10
Automate Your Security Testing Using MobSF
Mobile Security Framework (MobSF) is a free and open-source tool that automates security assessment for both Android/iOS pen-testing and security assessment framework capable of performing static and dynamic analysis on the android applications.
a. Setting up MobSF
- Run the following command to clone MobSF from Github.
$ git clone https://github.com/MobSF/Mobile-Security-Framework-MobSF.git
- Enter the folder
$ cd Mobile-Security-Framework-MobSF
- Run the Setup command.
./setup.sh -For Linux and Mac setup.bat -For Windows
b. Running MobSF For Linux and Mac: ./run.sh For Windows: run.bat
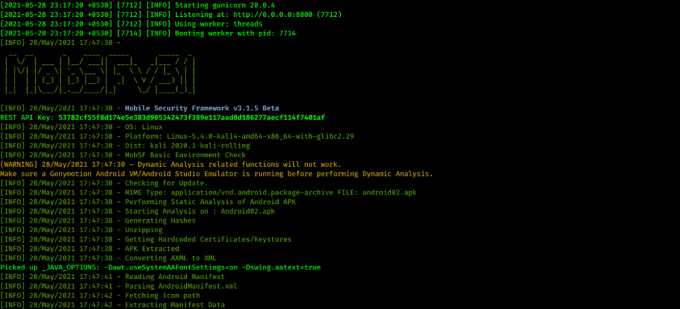
- Navigate to http://localhost:8000/ to access the MobSF Web interface.
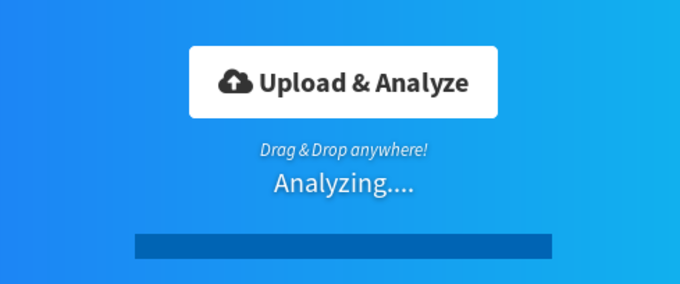
- Click on Upload & Analyze button and upload your apk file.
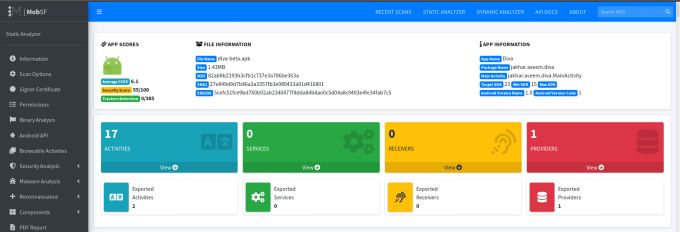
- An automated security scan report will be generated once the assessment is done.
- You can also analyze your previous scans and download your reports.

Practice Lab — DIVA Android
DIVA (Damn Insecure and Vulnerable App) is an Android App that is intentionally designed to be insecure with different labs and you can easily practice to enhance your skills.
- Click Here to download the DIVA apk file.
- Install the application on your device and dig into it to solve the labs.
Solutions— DIVA Android
- Click here if you need some help in solving the labs.
Learning is a continuous process and no piece of knowledge goes in vain. I enjoyed writing this blog and learned a lot during the process. I hope you enjoyed reading this blog as well and found it to be informative. Please feel free to contact me on Twitter for any feedback on this.
Until next time, happy hacking. Cheers & stay safe!