It is no secret that mobile devices are on the rise. According to the first-quarter 2021 Nielsen Total Audience Report consumers now spend almost half of their time across devices. This includes TV, TV-connected devices, computers, smartphones, and tablets. This has put mobile security under the microscope of professionals in the field.
iOS for example, is a quandary on its own. Apple’s closed system aids in its ability to remain more secure through limited access. However, this does not assure application security by default. So what’s application security and how does it apply to our lesson today?
Application security defines methods by which mobile apps, web apps, or APIs (Application Programming Interfaces) are secured from potential attackers. iOS is a dominant operating system in the mobile device market. This popularity has spurred creation of various applications and ultimately makes them prime targets for attackers.
In this blog we walk through methods to discover unseen flaws in iOS devices. There is no device 100% secure from threat actors looking to exploit new vulnerabilities. So, we are going to cover the most important aspects pertaining to iOS application security. So, without further ado, let's get started.
iOS Architecture
Let’s go through a brief rundown of the iOS architecture. iOS applications talk with hardware through a collection of well-defined system interfaces. These interfaces provide translation for applications that may be utilizing various types of hardware. In turn, making the development process smoother. Below, we cover these layers to get you familiarized.
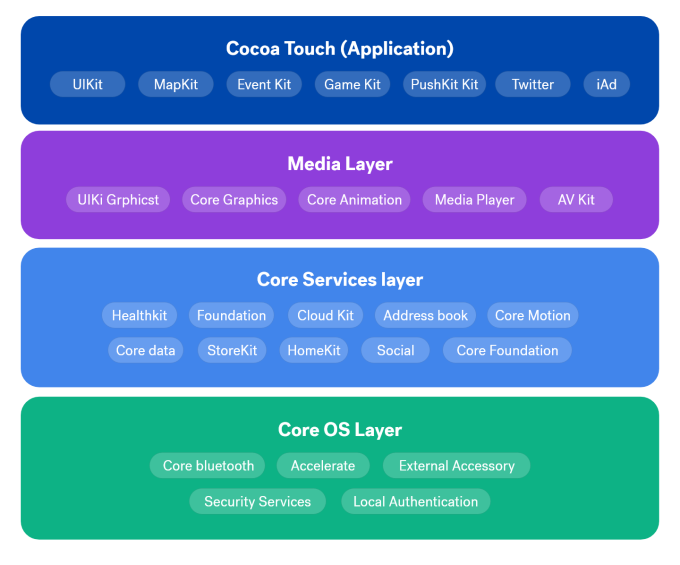
Core OS: This layer sits directly on top of the device hardware and is the last in the iOS stack. The Core OS layer provides low-level features that are the foundation of all of iOS features. It provides a variety of services, such as low-level networking, access to external accessories, and the usual features of a basic operating system, such as memory management, file system handling, and threads.
Core Services: The Core Services layer provides an abstraction over the services provided in the Core OS layer. It provides fundamental access to iOS services.
Media Layer: The Media layer provides multimedia services that you can use within your iPhone. It enables all the graphics, audio, and video technology of the system. It allows the developer to work with photos, videos, audios, animations, graphics-like things.
Cocoa Touch: Cocoa-Touch layer provides an abstraction layer to expose the various libraries for programming the iPhone and other IOS devices.
Jailbreak
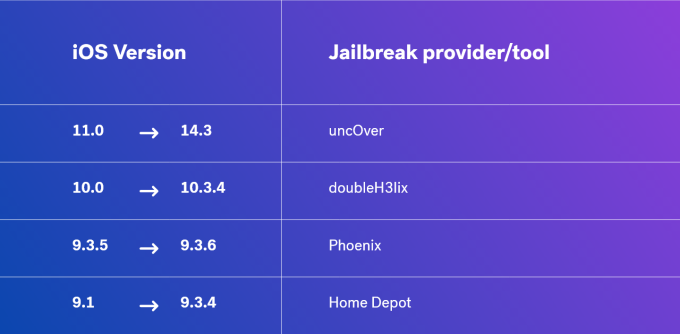
Jailbreak is the method lifting user restrictions on your device set by the company. It is important to know that jailbreaking voids the warranty of your device. There are various jailbreaking methods for iOS - differing version to version. Canijailbreak is a great website for suggesting jailbreak tools based on the iOS application. It is worth mentioning, jailbreaking can be done using Windows, Mac, or Linux. Furthermore, we have different classifications of jailbreaking - which are defined below.
Untethered Jailbreak: Permanent Jailbreak, the device will be jailbroken even after a reboot.
Tethered Jailbreak: Temporary Jailbreak, after a reboot device, will be back to its normal state.
Semi-tethered Jailbreak: A semi-tethered jailbreak is one where the device can start up on its own, but it will no longer have a patched kernel, and therefore will not be able to run modified code.
Semi-untethered Jailbreak: A semi-untethered jailbreak is similar to an untethered jailbreak in that it allows the device to boot up on its own. The device startup sequence is unaltered on each boot, and it boots into its original, non-jailbroken state. However, rather than using a computer to jailbreak, as in a tethered or semi-tethered case, the user can re-jailbreak their device using an app that runs on their device.
The jailbreak process is simple and takes around 2-5 minutes. Here are some tools that you can use to jailbreak particular versions of iOS:
File Structure of an IPA
To start, we need to examine the structure of the IPA file by renaming the IPA to .zip extension, so we can unzip it. After unzipping it, we will get the below contents.
- App binary: The executable file containing the compiled (unreadable) application source code.
- Info.plist: Configuration information, such as bundle ID, version number, and application display name.
- Frameworks: List of dynamic libraries.
- Embedded.mobileprovsion: These are certificates.

IOS Application Sandbox Structure
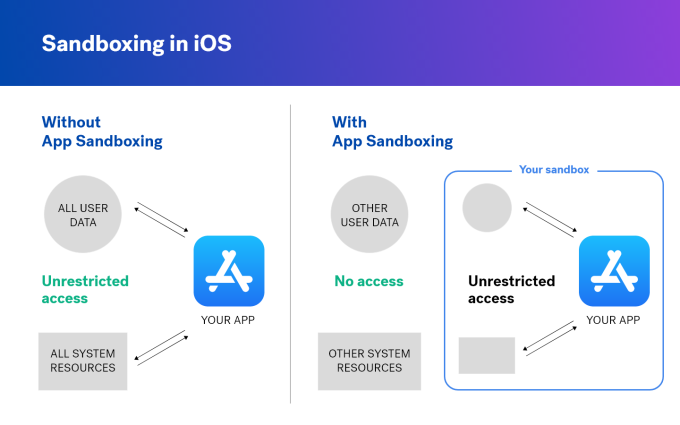
So, how do applications operate within iOS once installed? Well, Apple sandboxing allows applications to set up local databases on said device. This keeps them segmented from other apps. iOS assigns each app its own sandbox to ensure that there are no conflicts, since multiple apps will be storing data on the device’s hard drive.
There are 3 types of sandboxes in iDevice
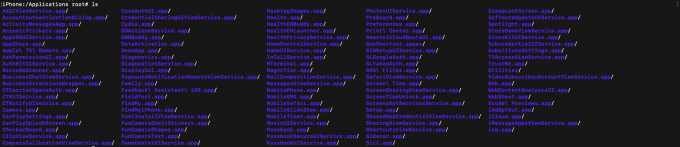
- Pre-installed App Directory — /var/Application
The applications that come pre-installed by default on the iDevice have their app files stored in this directory.
- Bundle Directory — /var/containers/Bundle/Application
The “Bundle” directory, also known as the “IPA Container,” contains all of the files that come with apps when downloaded from the Apple App Store. Also, downloaded from other locations as-well. The files in this directory will remain the same throughout a particular application version.

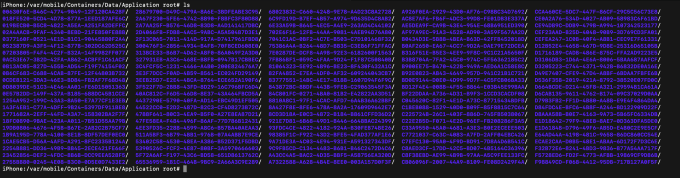
- Data Directory
/var/mobile/Containers/data/Application The “Data” directory, also known as the “Local Data Storage Container,” contains files the developer wants to keep. These are items that pertain to the application while installed on the device. For instance, files that could be used for caching information for quick access, or storing offline data as a backup for resuming the application use.
It is always good to familiarize yourself with these directories. Now, we can start setting up our lab.
Lab Setup
Unlike Android, Apple has only one publicly available iOS emulator - Corellium. You do have to pay to use this emulator. There is a trial service, but I would personally recommend you stick with a physical device for testing.
So, what should we use? I recommend the vulnerable iOS applications below to test with.
Now that you have a resource to test against, we can step into the lab.
Methodology
First, we will need the application’s IPA file. The IPA file can be obtained in a variety of ways. Rename the IPA file extension to .zip and extract the contents. We can find the .plist files in the extracted content. The .plist files contain the application’s configuration. For example, schemas used by the application are stored - so we can look for hardcoded credentials for the application. Then we can use tools like otool, hooper, Ghidra, and IDApro to review the source code and analyse the binary protection.
Here are some tools that can auromate some of the above work:
- MOBSF (Offline Scanner)
- immuniweb (Online Scanner)
- oversecured (Online Scanner)
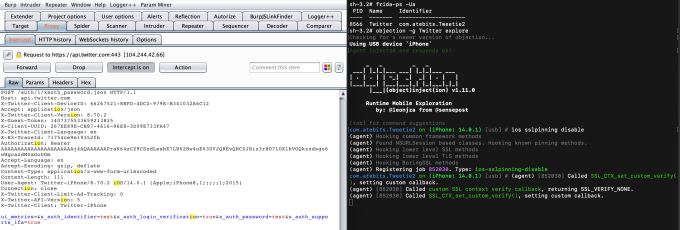
These methods fall under the scope of Static Application Testing (SAST). For the Dynamic Application Security Testing (DAST), we'll need to configure the device proxy in Burp Suite to intercept the requests.
Hands-On Testing
SSL Pinning
SSL pinning is used by the developer to ensure that all data is transferred between a web server and client securely. We can use the tools listed below to bypass SSL pinning.
- Frida
- Objection
- SSLKill switch ( supports till 13.x)
- Manual Approach
SSL pinning bypass using Frida for iOS
Frida is a dynamic code instrumentation toolkit. It lets you inject snippets of JavaScript or custom libraries into native apps on Windows, macOS, GNU/Linux, iOS, Android, or QNX. This comes in handy when injecting JavaScript to explore native apps on their respective OSs. Let's confirm if Frida is working or not? Make sure your device is connected to the PC using a USB cable at.
Type this command to get the application name.
__frida-ps -Ua__
Now, try running the command below to bypass SSL pinning for the iOS script.
__frida -U -f it.app.mobile -l frida-iOS-repinning.js — no-pause__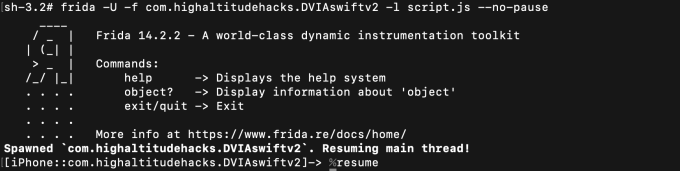
(Here’s a quick explanation of the command above)
U stands for “USB device”f stands for “Filename”l stands for “location of js file”no-pause stands for “automatically start main thread after startup”
Frida installation on Jailbroken Device:
People from the community have shared more Frida scripts here. We use them for multiple use cases when pentesting iOS applications.
SSL Pinning Bypass using Objection for iOS
Objection toolkit, powered by Frida, allows you to test and analyze your mobile applications security posture without requiring a jailbreak. As it provides the easiest way to hook an application in runtime. I frequently use it to bypass SSL pinning on iOS and other issues. Basically, it lets us complete Frida operations efficiently.
https://github.com/sensepost/objection
To get started with objection we need to install it using the below command:
- pip3 install objection
- Connect iDevice via USB
- objection -g mytestapp(screen name) explore
- iOS SSL Pinning disable
SSL Pinning Bypass using SSL Kill Switch 2 for iOS
SSL killswitch 2 can also be installed to bypass SSL. It’s as simple as its name implies. Just like previous methods, you will need a jailbroken device. If you’re familiar with the Xposed framework for Android, then you can think of Cydia as all of those features on iOS.
Cydia
Cydia installer is a third-party app installer for iOS devices that is available for free. Cydia is used to download apps and games that are not available on the iOS app store. In this case, we’d find something called “SSL Killswitch.”
SSL Kill Switch 2 Installation:
SSL Pinning Bypass using Manual Approach
The methods we mentioned above should work! If not, this will definitely work. If you have a deeper knowledge of the IPA file, use disassemblers to modify the IPA file to bypass any certificate validation. Hopper and IDA are two of the most popular disassemblers. Some words of caution, modifying the IPA will almost certainly break the signed app. Rendering it uninstallable on an iOS device. You can reinstall the mobile app after signing the IPA file.
Insecure Local Storage
Have you heard about Insecure local storage testing in Android? Good news! iOS can be exploited in the same way. We will begin looking in the files below for sensitive data stored locally.
Plist File in the App Directory
Plist (Property List) is a flexible and convenient format for storing application configuration data. We can call it as the manifest for an iOS application. It’s a property list file from Apple. It decides what icon to use for a bundle, what document types an app can support, and many other behaviours that have an impact outside the bundle itself. These files may contain sensitive data like Gmaps API key, etc.
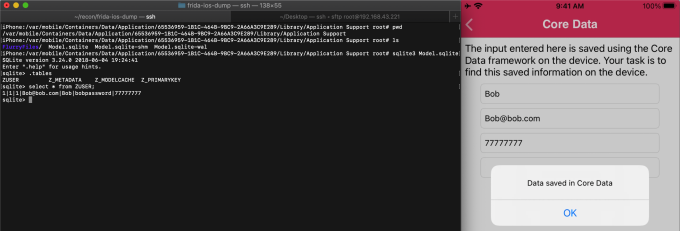
Database Files in the App Directory
Data required by iOS applications are often stored in SQLite databases. Testers should look for sensitive data in the data protection values of these files and their contents. A module for interacting with SQLite databases is included with Objection. It allows you to export the schema, tables, and records. We can look for sensitive information stored in database files. Some extension we can look for are .db’, ‘.sqlite’ or ‘.sqlite3.
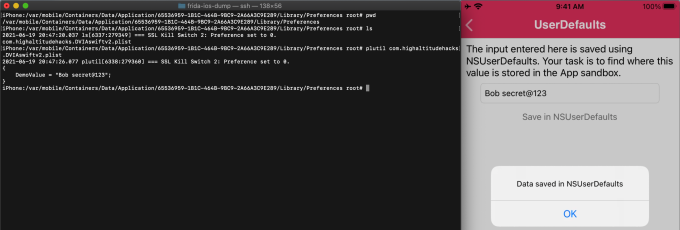
NSUserDefaults
NSUserDefaults is one of the most common methods of saving user preferences and properties in an application using NsUserDefault. Even if you close the application and relaunch it, the NsUserDefault information persists.
NsUserDefault stores data in Plist file format file under preference folder will be NsUserDefault.
Extraction of IPA from iDevice
- Take an SSH shell of iDevice
- Find the application sandbox directory, which is the bundle container of the application.
- Use the following command to find the .app directory of the application.
Ex : APP-Name in our case.find | grep "APP-Name" - Now, navigate to the .app directory.
- Make the folder with the name Payload
- Copy the application-specific .app file in the Payload folder
cp -r APPexecutable.app/ Payload/ - Compress the .zip file at desired location as shown
zip -r /var/root/dumpapp-name.ipa Payload/
We will then have the IPA in var/root/ location
Application Binary Protection
Unlike an Android application, the binary of an iOS app can only be disassembled - not decompiled. A Mach-O binary file is the app binary of an iOS application. It is the machine code or executable file that runs on an iPhone. Completely reverse engineering of an iOS application to produce the source code is not possible. However, specified parts of object files or libraries can be dumped using existing tools. This is where Otool comes in.
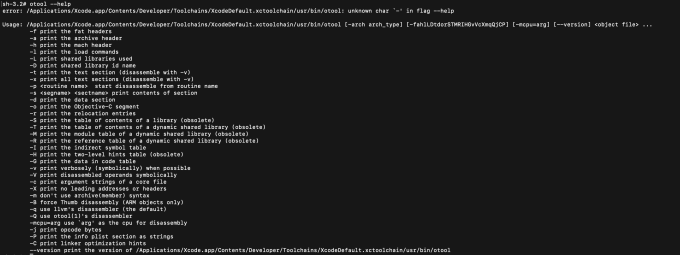
Otool
Xcode includes Otool as part of its command-line utilities. Numerous options are available to help you disassemble Mach-O binaries. It is possible to learn about the APIs that an iOS application uses by using otool. Additionally, we can use this to find out what classes and methods are being used if Objective C is the implementation.
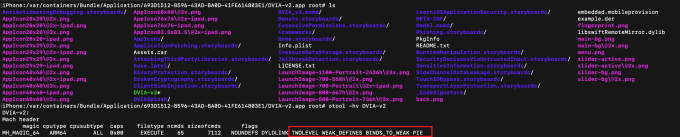
PIE (Position Independent Executable)
In the context of memory protection, address space layout randomization (ASLR) is a method for securing operating systems (OS) that guards against buffer overflow attacks by randomly generating the location of the executables that are loaded into the memory of the OS. In iOS, this is achieved by compiling the application binary with a flag called PIE (Position Independent Executable). When ASLR is disabled in an iOS application, certain memory structures and modules will not be placed randomly, creating the potential for a Buffer Overflow. Using the following command, we can determine if ASLR is enabled or not? PIE flag present indicates implementation of ASLR.
If Otool is installed run the following command:
otool -hv appname
Stack Smashing Protection
Stack smashing protection is an exploit mitigation technique that protects against stack overflow attacks. This is done by placing a random value known as a “Stack Canary” before local variables on the stack. iOS applications that use the stack canaries will contain the below symbols in the binary.
_stack_chk_fail_stack_chk_guard
To find out if the application is vulnerable to stack smashing protection, we can use the command below:
otool –I –v AppBinary | grep stack
Jailbreak Detection Bypass
Jailbreak detection bypass can be done multiple ways. Below is a quick list:
- Objection
- Liberty Lite
- Frida
- Manual Approach
Jailbreak Detection Bypass using Objection
Objection is a versatile tool to help us while testing iOS. This video gives you a better idea of how we can bypass jailbreak detection on iOS.
Jailbreak Detection:
Jailbreak Detection Bypass using Liberty Lite
Liberty Lite is similar to SSL killswitch, it operates in a similar fashion. Below are the steps to install the liberty lite and bypass the Jailbreak detection on the idevice.
- Launch Cydia and select the Sources tab
- Click Edit > Add and paste the URL of Ryley's Cydia repository: ryleyangus.com/repo
- After installing the repository, tap on it and navigate to the "All Packages" section.
- Install the following package
- Go to Settings > Liberty Lite to apply app-specific patches.
Slide the toggle for the desired application for Block Jailbreak Detection. 6. Slide the toggle for the desired application for Block Jailbreak Detection.
Note: Liberty Lite only works for iOS 13 and below.
Jailbreak Detection Bypass using Frida
This method is a bit complex one you need to work on the application. You can refer to this blog if you’re interested in digging into Frida more.
Manual Approach
Most of the time, any of the above three methods would work. If not, then you need to be sure that source code is not obfuscated for the application. Then lookup the specific codebase that is responsible for triggering the jailbreak function. You will need to remove/replace the code and then resign it (you need an apple developer account for resigning the application).
Fingerprint Bypass
People believe biometric authentication is entirely secure, but that’s a myth. To bypass biometrics, you don’t need to have the same fingerprint/face as the target. We could instead go straight for the mechanism that checks the fingerprint. If it is insecurely implemented, then we can bypass the check.Let's see how we can bypass biometrics authentication in iOS.
Previously, we talked about tools like Objection and Frida. Both of these tools can also be used to bypass biometrics. We will be testing out fingerprint bypassing using Objection. You should have a fingerprint set on the phone prior to doing this. To begin, run the following commands in the terminal.
- objection — gadget DVIA-v2 explore
- ios UI biometrics_bypass
Now, click on the fingerprint on the screen for Swift or Objective-C. This will prompt you to put your fingerprint in. Be sure to put the wrong finger on the fingerprint sensor. This should trigger a response saying your input was wrong and to try again. Hit the cancel button instead of trying again. Now you will see a new popup from within the application telling us the fingerprint was successful! This works for both Swift and Objective-C functions without any modification!
Biometric Bypass:
Sensitive Data in Keychain
It is always wise to look for Keychain data persistence when assessing iOS applications. Keychain is a password and certificate management system for iOS. It can be used to securely store sensitive bits of data, such as encryption keys and session tokens. Keychain is implemented as an SQLite database that can only be accessed through the Keychain APIs. It is common storage for all wifi passwords as well as application data. All these items are stored in an encrypted database whose path is /var/Keychains/keychain-2.db
The below video shows how we can execute a Keychain Dump. There are many tools out there for dumping the keychain, but we can use the Objection here to dump the keychain. The following objection command demonstrates this procedure:
- Objection -g mytestapp explore
- ios keychain dump.
Keychain Dump using Objection:
Sensitive Information through Clipboard
Text copied in iOS is stored in the buffer. This data can then be used in different areas of the application as-well-as other applications on the device. The implication being that clipboard data might be accessible by any application.
Alternatively, we can monitor the pasteboard data too; the below video shows the monitoring using Objection.
IOS Pasteboard:
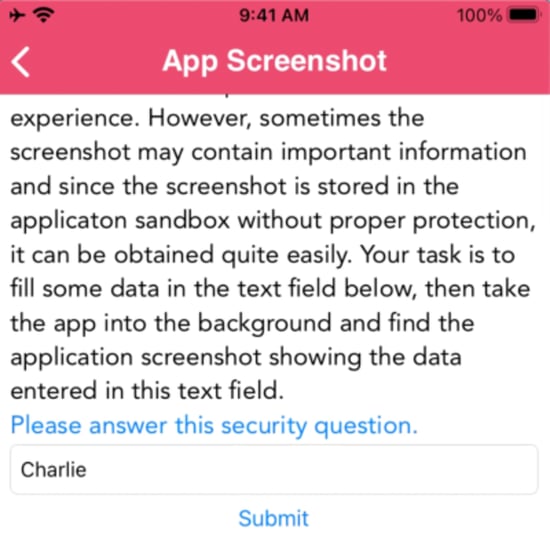
Background Screen Caching
Everytime an iOS app switches to the background it takes a screenshot, by default. That screenshot could contain sensitive information about the victim. In iOS, the screenshot gets saved in the below directory.
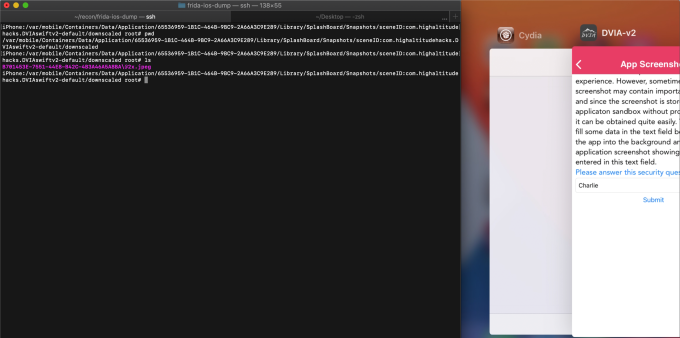
‘Library/Caches/Snapshots/<Bundle_Identifier>’Let's take an example. In the below snapshot, we can see there's some sensitive information there.
Here in the below image, we can see the snapshot captured and stored in the specific location while switching the applications. The left image shows the screen of the application, and the right image shows the snapshot captured in the local storage.
Useful tools and setup
- Frida — Run time hooking iOS application
- Objection — Run time hooking iOS application
- Hooper/cutter/ghindra — Disassemblers
- plutil — Plist viewer
- passionfruits — Simple iOS app BlackBox assessment too
- Mobsf — Static and dynamic analysis scanner
- darwin CC tools — A useful set of tools like nm, and strip that are capable of auditing mach-o files.
- otool — Object file displaying tool
- grapefruit — Runtime Application Instruments for iOS
- Here is a git repo where you can find many other tools used for iOS Pentesting
That's all for this writeup, the main aim with this piece was to offer an overview of the iOS Pentesting methodology. Thank you for reading, hope you found this content useful. Read more about how Cobalt's PtaaS platform empowers developer.