In this two-part blog series, we will discuss the overview of thick client applications and the type of architecture present. We will check some low-hanging vulnerabilities and discuss automated code scanning using Visual Code Grepper (VCG). We will also debug the application, which may leak sensitive information.
Overview of the thick client applications
Thick clients are computing workstations containing nearly all components required for independently operating and executing software applications.
A thick client is a component in the architecture of client-server computing systems that typically connects to the server through a network connection and does not consume any of the server's computing resources to execute applications.
Although web apps are everywhere, many people still use thick client apps on their computers.
Testing thick client applications, for example, requires patience and a systematic approach, and simple automated assessment scanning does not suffice. A custom set-up is often necessary, as well as specialized tools.
The architecture of thick clients
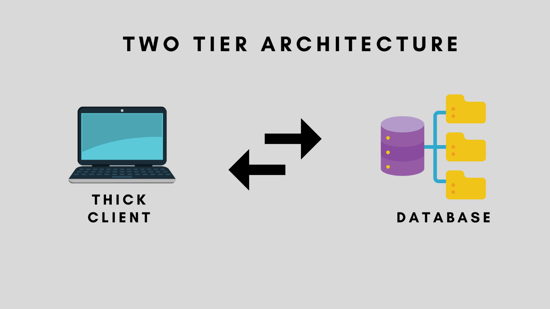
Two-Tier architecture
We use client-server architecture for the two-tier system. Clients and database servers communicate directly. A central server doesn't have to be involved in the communication between clients and database servers.
Three-Tier architecture
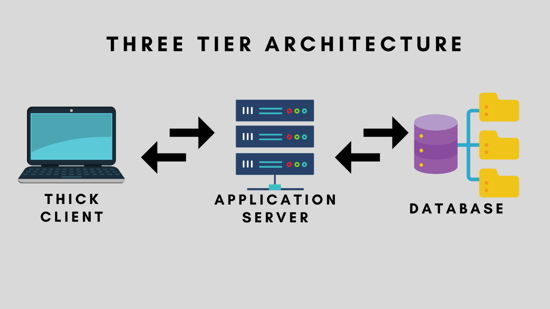
Client, Application Server, and Database Server comprise the three tiers based on a three-tiered architecture. The Application Server acts as a connecting element between the client and server. It transmits information from the client to the server and vice versa.
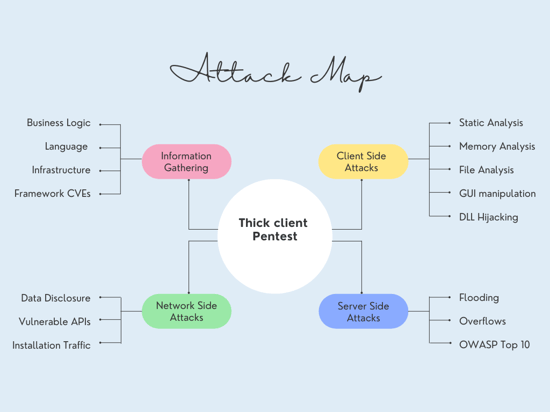
The Attack Map for thick client pentest
Explore the application
To conduct an effective pentest, one must understand all aspects of the application. We must look at all parts of the UI using the credentials given. Later in this series, we will consider the features and vulnerabilities of vulnerable thick client applications.
Information gathering
We should collect the information given below about the application.
- Application Architecture
- Platform Mapping
- Languages and Frameworks
To do that, we will use tools like CFF explorer and Detect it easy.
CFF Explorer:
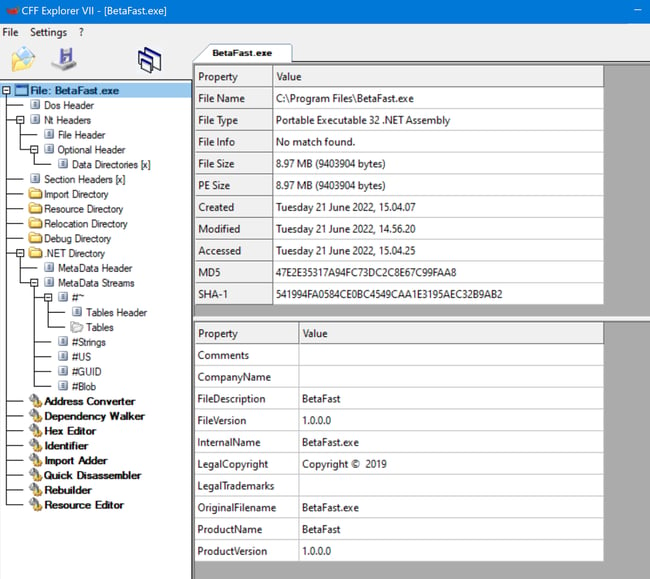
Let's open the CFF Explorer, and we can look around. The purpose of CFF explorer is to check how the binary is built, if possible.
Navigate to file> open > BetaFast.exe as shown below image.
“Detect It Easy”:
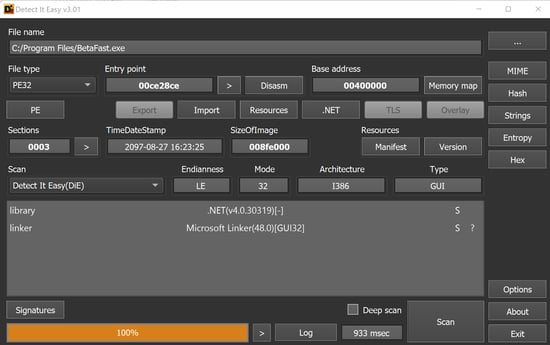
Another tool like "detect it easy" can also be used to get more information on binary.
Network analysis
TCPview:
It is also essential to discover which servers the application is communicating with during its run-time while it is running. Use this information to determine if the application communicates with a secure remote host. To view the connections between the local and remote machines, you can use TCPView in Sysinternals Suite.

Wireshark:
Wireshark can also obtain the same information, which is another tool you can use. While running the application, capturing the packets during the process may be possible.
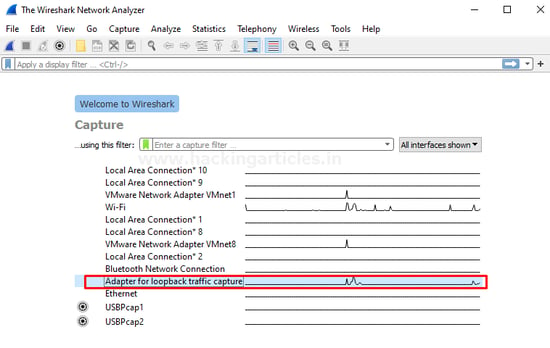
In this case, loopback traffic capture makes sense as we will use a loopback address.
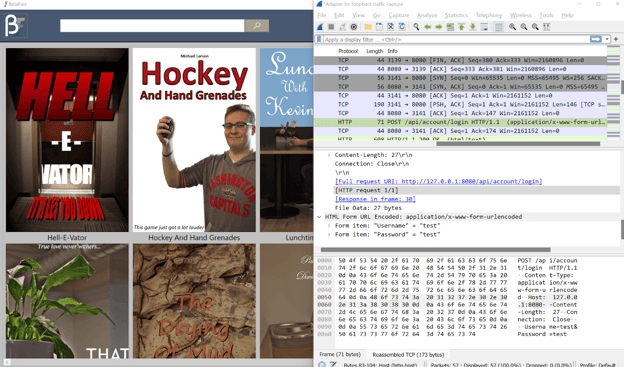
Now open our application and start traversing through it. Visit the Wireshark application and notice the traffic generated by the binary.
Binary analysis:
There are many ways to benefit from understanding how an application is constructed, including reversing the binary.
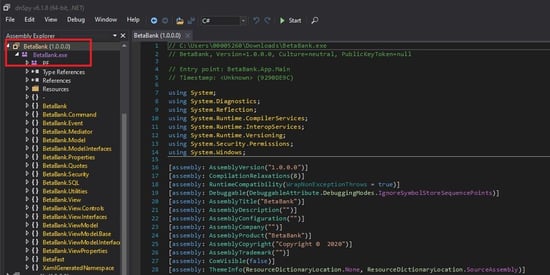
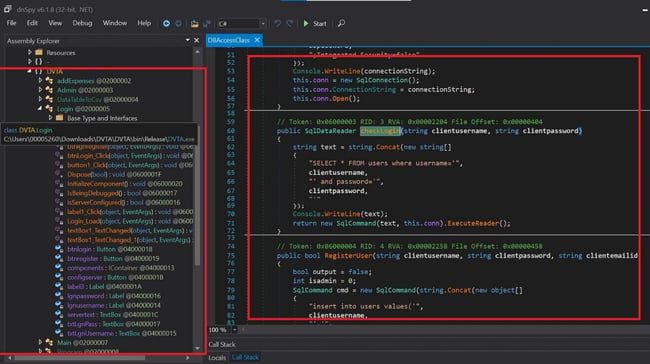
After identifying the language it is built on, we can use a specific tool to decompile the binary. Since this is made using C#, we will use Dnspy to decompile the binary.
Download and open the DnSpy application. Navigate to the file and open the target application.

Notice that the application code is visible, and we can see all classes present.
Capturing the Database connection string by debugging with dnspy
In this part, we will examine outgoing data after debugging with dnSpy.
It is obvious that since we want to capture the database connection string, we want to use a function that can talk to the database server. You might consider adding a breakpoint where the data is transmitted. You should set a breakpoint to modify the information if we wish to change the data.
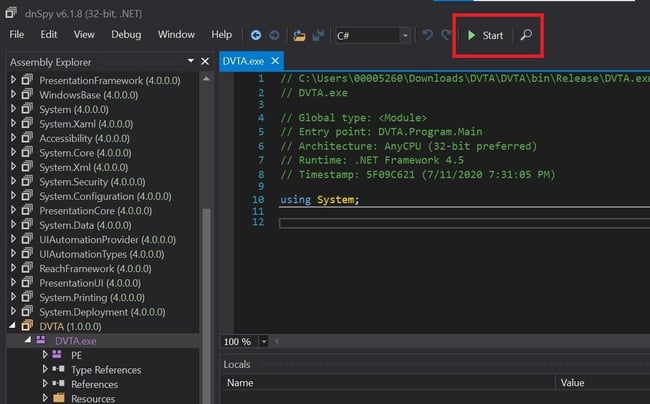
Open DnSpy and load the binary. You can start debugging the application using the start button.
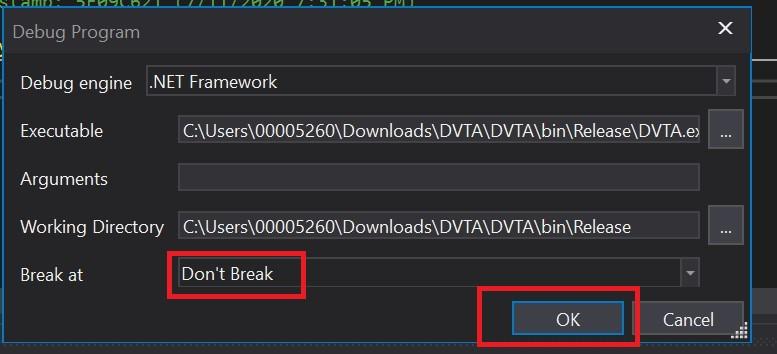
A pop-up box will appear. Select the don't break option and click on "ok".
The application will start running. We will put some random credentials, which will be enough to talk to the database server. After hitting the login button, we will "pause" the debugging.
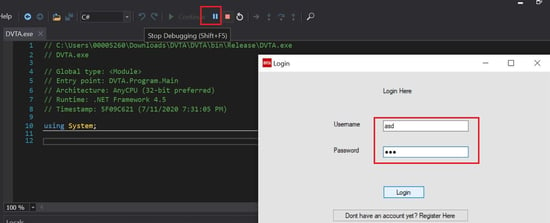
We will break in "System.data". You should note that this is a system DLL, not part of the application itself. Let's see what dnSpy has to offer.
Go to the "Debug" module under dnspy and select windows. Choose "Call stack" to see what the other dll or exe has been called.
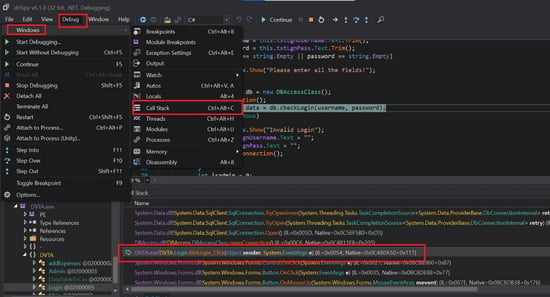
Double click on the DVTA.exe(Login) under the stack and see the code. "db.checkLogin" takes the username and password. We will click on it to read the code. We can notice that an SQL connection is being initiated in this code.
Now go to "Locals" and select "db" then, under conn, we can find "_connectionString", which discloses the username and password of the database server.

Modifying and Patching the application
We will enable the "configure server button" by modifying the original DVTA application.
In the real world, when we perform pentesting on a thick client application, there might be some cases where the user can not access menus available in the application. Developers tend to disable those menus thinking an end-user can not enable them.
The most important thing now is to identify the location of the button that is disabled and then patch the binary to become enabled.
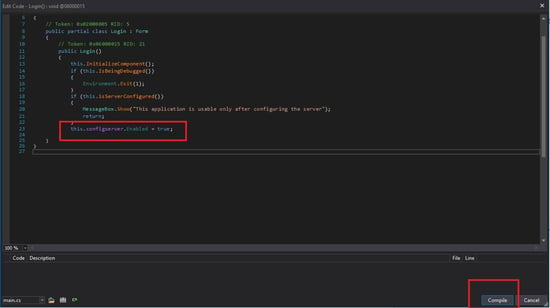
Open the exe in DnSpy and navigate to the Login page source code. Notice the line "this.configserver.Enabled = False;”. This is the part that will always get executed with the value "False."

As you can notice that this is C# language, we can edit and recompile the code using Dnspy directly rather than changing it in IL(intermediate language) code.
Right-click on the "false" keyword and select "Edit Method." A new window will pop up to edit the source code.
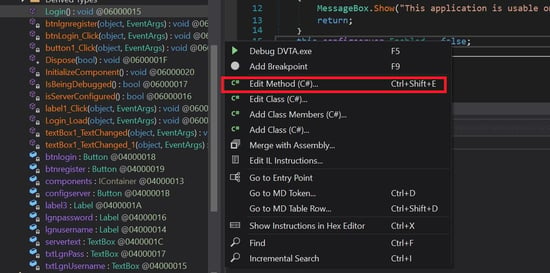
Now change the value to "true" from "false." And click on the compile button.
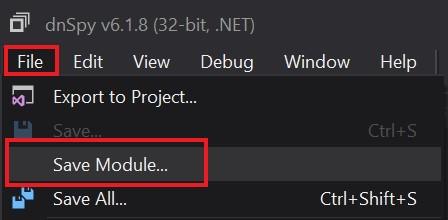
Navigate to "File" and select the "Save Module" option. Choose the destination.
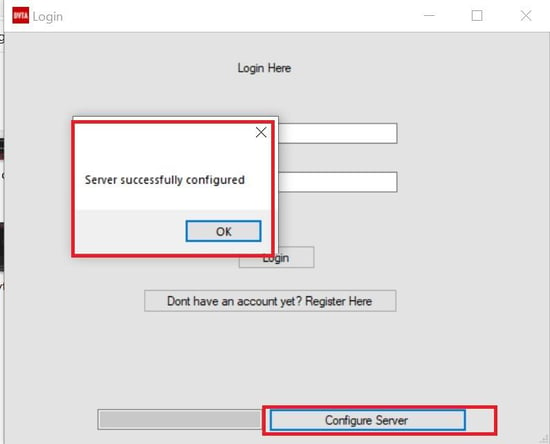
Open the newly patched application and notice that we can now configure the server.
Editing with IL(intermediate language) Code
C# or Java aren't compiled directly to machine code but into another intermediate code. In the vast majority of Portable Executable (PE) files compiled and assembled from C#, whether they are .dlls or .exes, the IL and the metadata accompanying it are the only two components. A just-in-time (JIT) compiler then translates this IL into native code at run-time.

Now select the IL code from DnSpy and scroll down to see the IL code of configserver.

Ldc_I4_0 Field Pushes the integer value of 0 onto the evaluation stack as an int32. Now right-click on the value of ldc.i.0 and choose "Edit the IL instructions." Select ldc.i4.1 and click on the ok button.
This is a special short encoding for pushing the integer value 1.

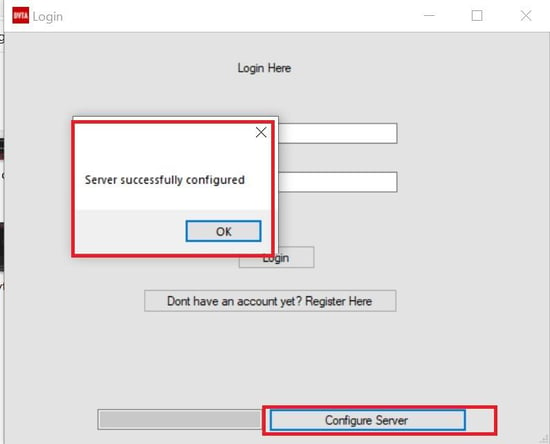
Follow the same steps mentioned above to save the new .exe file. Open the application and notice that you can now configure the server.
Application signing
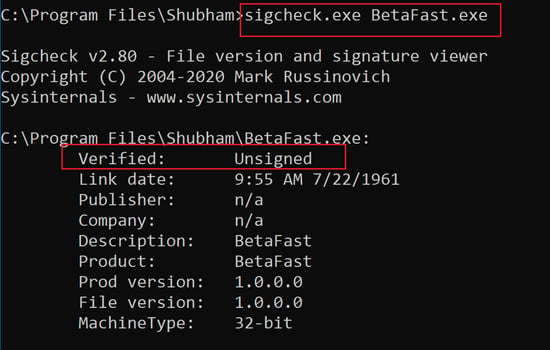
When conducting penetration testing exercises, it is common to find that developers don't sign applications before releasing them to their customers. Applications must be signed for the integrity and reputation of an application to be guaranteed.
Depending on whether a small company signs the software, we may be able to analyze additional factors such as the number of downloads, anti-virus reports, browser security checks during the download, etc. Code-signed software is more likely to be trusted by users.
Sigcheck.exe is part of the Sysinternals Suite of tools, which you can use to verify this.
Type the following command in the Command prompt to check if the application is signed or not.
Sigcheck.exe "application path.exe."
Binary Protections:
Compiling libraries and executables with additional security measures can prevent code exploitation.
- Address Space Layout Randomization (ASLR) – ASLR randomly assigns memory locations to applications at startup, protecting applications from code-execution attacks such as Return-to-Libc.
- SafeSEH – An attacker can't force the application to execute code when someone calls a malicious exception handler because a list of safe exception handlers is stored within a binary.
- Data Execution Prevention (DEP) – You can mark parts of memory as nonexecutable, so attackers can't store code for a buffer overflow attack in those parts.
- Controlflowguard – Limits from where code can be executed based on ASLR and DEP.
- HighentropyVA – 64-bit applications that use ASLR.
- /GS (Buffer Security Check) – On functions that the compiler recognizes as subject to buffer overrun problems, the compiler allocates space on the stack before the return address.
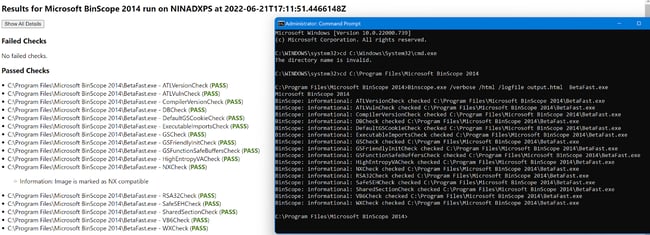
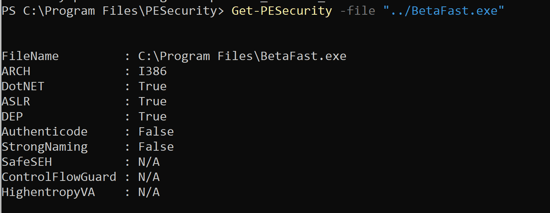
We will use binscope, which supports HTML output and the other tool from NetSPI called PE-security.
Use the following command to save the output in an HTML file.
Binscope.exe /verbose /html /logfile outputfilepath.html target.exe
Using PESecurity, we can also see the compiler protections enabled for the binary.
Automated Source Code Scanning:
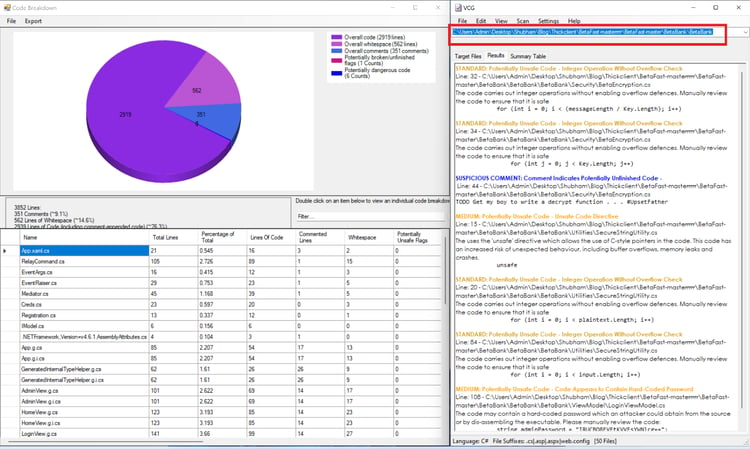
Once we decompiled the binary, we can use an automated code scanner to identify security vulnerabilities.
Submit the directory consisting of the code for the binary to the 'VisualCodeGrepper" and wait for the result. VisualCodeGrepper identifies security vulnerabilities and presents them in a pie chart.
Lack of Code Obfuscation
Obfuscation is the process of making something harder to understand. Often, programs are obfuscated to prevent someone from reverse engineering them and protect intellectual property or trade secrets.
The code can be decompiled using some tools such as JD GUI and Dnspy when developers do not obfuscate the code when compiling the binary. This allows attackers to traverse through the available code.
We will use DnSpy to decompile the application and read the code.
That is it for this part of the "Attacking Windows Applications". Read the second part of the series with more test cases for attacking Windows applications.


